AI can clean scratches, dust, fading, and small tears in an old photo. It can also sharpen soft edges and create a colorized interpretation. The most important part is deciding what should be repaired and what should stay untouched.
A scratch across a blank wall is usually low risk. A crease across an eye, a uniform insignia, or handwritten text needs much more care because AI may infer details that were never visible in the source.
Start With a Preservation Copy
Keep the original scan before making any changes.
If you are scanning a print, aim for:
- An even, glare-free image
- The full photo edge when possible
- A straight, uncropped scan
- Enough detail to inspect faces and clothing
- A separate copy for editing
The original file is your reference. Every restored version should be compared against it.
Diagnose the Damage Before You Repair It
Use the visible problem to decide your first edit.
| Damage | Best First Action |
|---|---|
| Dust and small scratches | Remove surface marks |
| Fading or color cast | Correct tone and contrast |
| Creases and stains | Repair damaged areas conservatively |
| Minor blur | Enhance edges gently |
| Torn corner | Reconstruct nearby background |
| Damaged face | Compare with another original photo before accepting any result |
| Black-and-white print | Restore first, then create color as a separate version |
Repair broad damage before sharpening. Sharpening a scratch or stain can make it harder to remove later.
How to Restore an Old Photo With AI
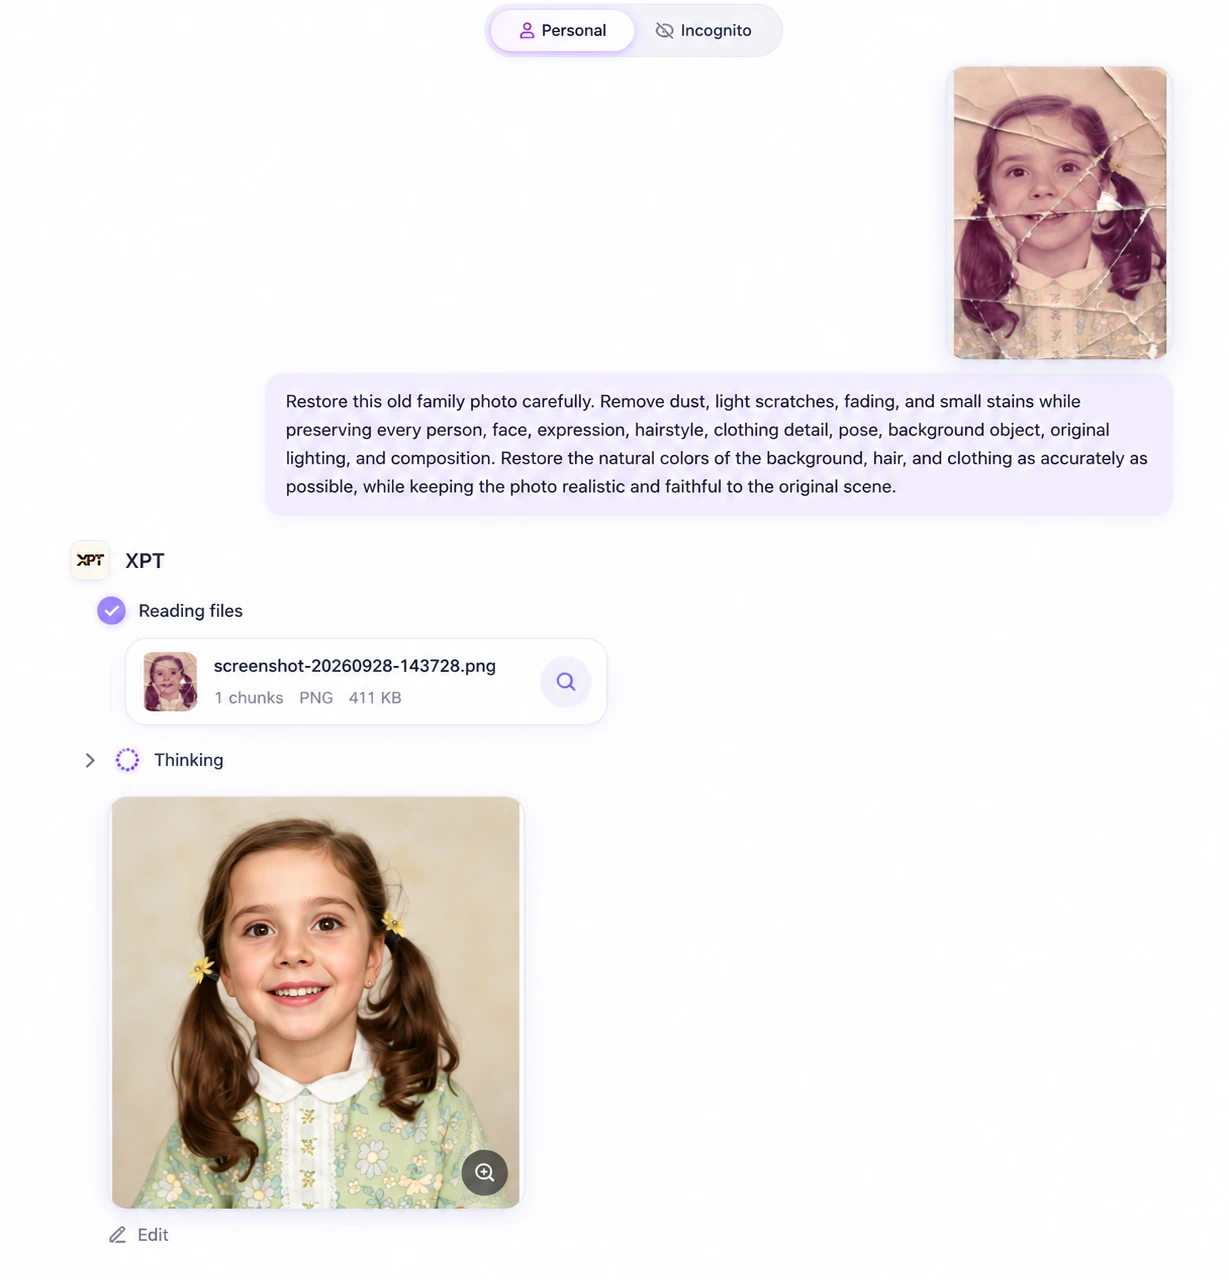
1. Upload the Best Scan
Open XPT and upload a copy of the photo.
State that the image is a restoration, not a modern re-creation.
“Restore this old family photo carefully. Remove dust, light scratches, fading, and small stains while preserving every person, face, expression, hairstyle, clothing detail, pose, background object, original lighting, and composition. Restore the natural colors of the background, hair, and clothing as accurately as possible, while keeping the photo realistic and faithful to the original scene.”
2. Repair One Type of Damage at a Time
For a heavily damaged photo, do not ask AI to fix everything in one pass.
First repair broad fading or discoloration. Then address scratches and creases. Only then consider light sharpening or colorization.
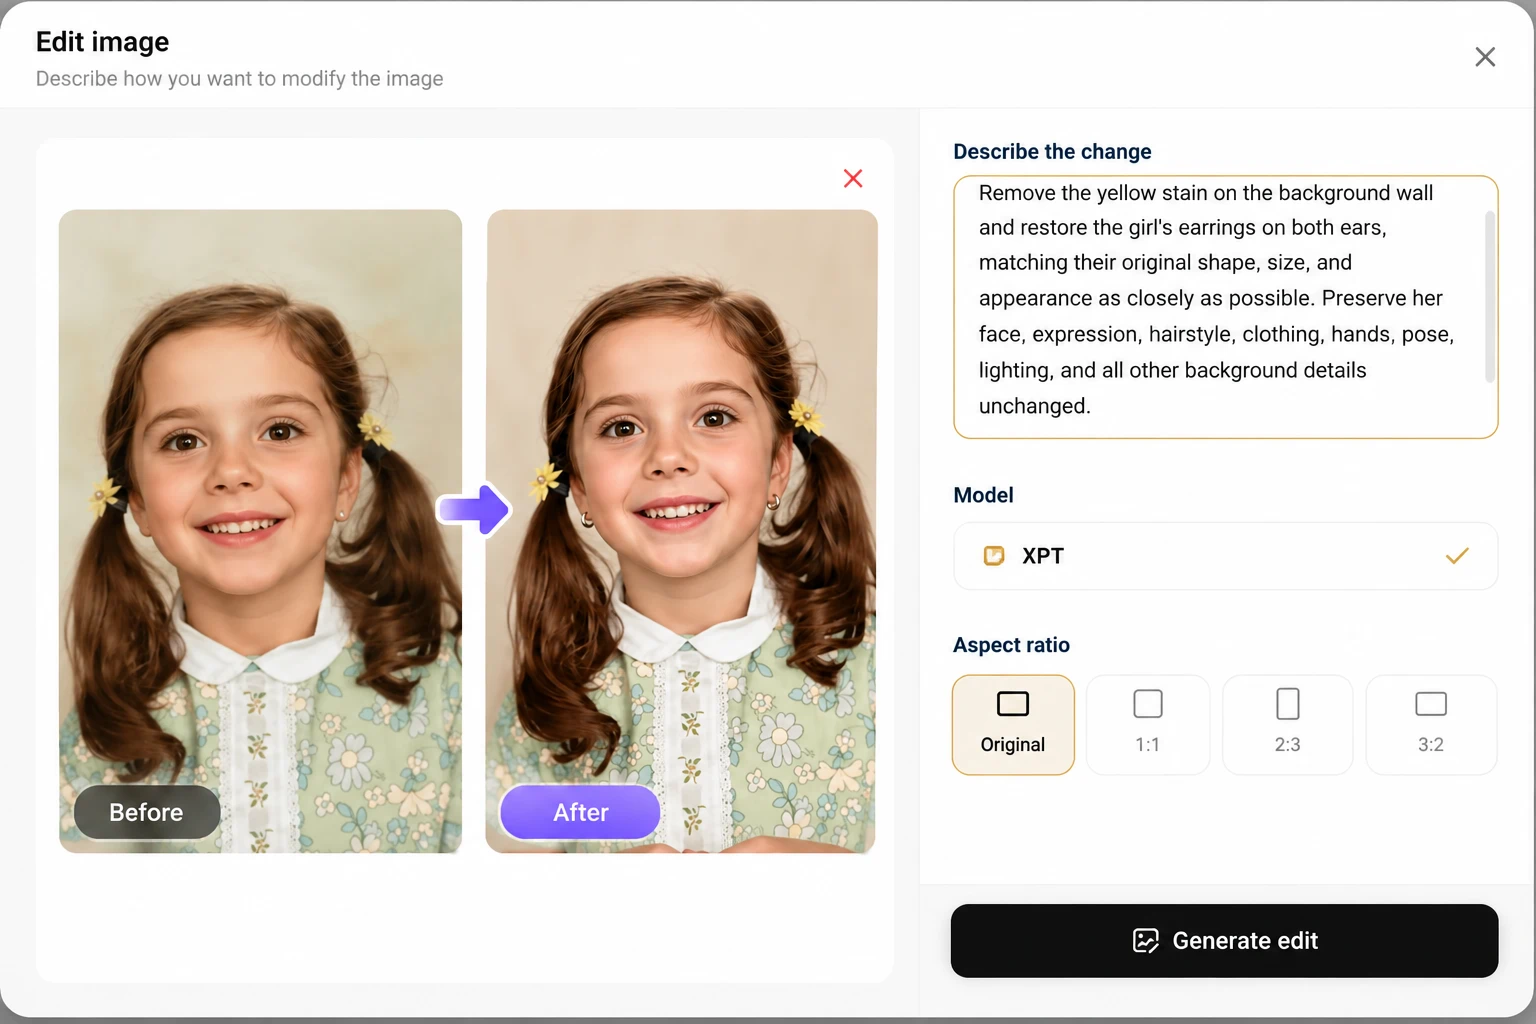
A focused follow-up prompt is easier to evaluate:
“Keep the restored photo unchanged. Remove only the yellow marks on the background wall and naturally reconstruct the wall texture and color. Restore the hoop earrings on both of the girl's ears, matching their original shape, size, position, and appearance as closely as possible. Preserve her face, expression, hairstyle, clothing, hands, pose, lighting, and all other background details unchanged.”
3. Verify Identity and History
Compare the edit with the original at the same size.
Check:
- Face shape and expression
- Eye position and hairstyle
- Clothing seams, buttons, and patterns
- Number and position of people
- Signs, badges, and text
- Architecture and objects
- Original framing
- Period-appropriate appearance
A clearer result is not automatically a more faithful one. If a face or meaningful detail changes, use a gentler repair or retain the original damage.
10 AI Photo Restoration Prompts
| Use Case | Prompt |
|---|---|
| Light damage | Restore this old photograph by removing light dust, small scratches, and minor fading. Preserve all faces, expressions, clothing, hair, background details, lighting, and original composition. Keep the image natural and historically faithful. |
| Family portrait | Restore this vintage family portrait carefully. Preserve each person’s exact facial features, age, expression, hairstyle, clothing, pose, and spacing. Remove only visible scratches, dust, stains, and faded areas. Do not add or remove people. |
| Torn edge | Repair the torn edge of this photo by continuing the nearby background and border texture naturally. Preserve every visible person, face, hand, clothing detail, object, and original composition. Do not invent new people or objects. |
| Creased print | Reduce the crease lines and surface stains in this old print. Preserve the original faces, clothing, room details, shadows, and photographic texture. Keep the repair subtle and do not smooth skin or modernize the image. |
| Faded color photo | Restore the faded colors and contrast in this photograph while preserving the original faces, clothing colors, background, lighting, and time period. Use restrained natural color correction without oversaturation. |
| Black-and-white photo | Restore this black-and-white photograph with balanced contrast and clearer detail. Keep it monochrome. Preserve all faces, expressions, clothing, background objects, composition, and original film character. |
| Gentle colorization | Create a separate, gently colorized version of this restored black-and-white photo. Preserve the original faces, expressions, clothing, background, lighting, and composition. Use subdued, historically plausible colors and do not add modern details. |
| Outdoor photo | Restore this vintage outdoor photograph by removing dust, scratches, and fading. Preserve the people, trees, buildings, landscape, shadows, clothing, horizon, and camera framing. Keep natural photographic texture. |
| Damaged wall behind a subject | Remove the stains and scratches from the wall behind the person. Preserve the person’s face, hair, clothing, hands, pose, shadows, and original background objects. Edit only the damaged wall area. |
| Conservative face restoration | Improve the clarity around the face conservatively. Preserve the exact face shape, eyes, nose, mouth, age, expression, hairstyle, skin texture, clothing, and lighting. Do not beautify, reshape, or create details that are not supported by the original photo. |
Colorize as a Separate Decision
Color can make an old photo feel more immediate, but it also introduces uncertainty. If you do colorize, keep a monochrome restoration as the primary archival version.
Use a prompt that leaves room for uncertainty:
“Create a separate colorized interpretation of this restored black-and-white photograph. Use soft, period-appropriate tones and preserve the original faces, clothing, setting, lighting, and composition. Avoid highly saturated colors or modern styling.”
If a uniform, object, or fabric color matters, verify it against another source before treating the result as accurate.
Common Problems and Fixes
| Problem | Prompt Adjustment |
|---|---|
| Face looks like a different person | Preserve facial geometry, age, expression, hairstyle, and natural asymmetry. |
| Skin becomes too smooth | Request natural skin texture and no beauty retouching. |
| Clothing details disappear | Name the clothing, buttons, patterns, and accessories that must remain. |
| A tear becomes a new object | Ask to reconstruct only the adjacent visible texture and prohibit added objects. |
| The photo looks too modern | Preserve the original film texture, contrast range, period, and color restraint. |
| Text becomes inaccurate | Keep the original text unchanged or compare with another source. |
| Colors are too vivid | Request muted, historically plausible colorization. |
Know When to Stop
AI restoration can improve visible damage. It cannot recover information that no longer exists in the image.
Treat these areas with extra caution:
- Faces hidden by tears or stains
- Written dates and names
- Military, school, or work insignia
- Product labels and signs
- Missing hands, jewelry, or accessories
- Important architectural details
When one of these details matters, preserve the original and compare the AI result against other photographs or family records.
For general photo cleanup and object edits, see AI Photo Editor With Prompt.
Start with a light repair, compare carefully, and keep every version alongside the original.