Creating one good AI character is easy. Keeping the same face, hairstyle, proportions, clothes, and visual style across multiple images is much harder.
The most reliable approach is to stop describing the character from memory. Create a fixed character reference, reuse the same identity description, and change only the scene, pose, or expression.
You can use XPT’s AI Character Image Generator to develop a character and create new images from the same visual identity. The relative link automatically follows the language directory of the current page.
Step 1: Define the Character’s Fixed Features
Write a short character description containing only the traits that should remain consistent.
Separate identity traits from details that may change.
| Keep Consistent | Change Between Images |
|---|---|
| Face shape | Expression |
| Eye color and shape | Pose |
| Skin tone | Camera angle |
| Hairstyle and color | Background |
| Body proportions | Lighting |
| Signature clothing details | Activity |
| Distinctive accessory | Additional props |
| Illustration or photo style | Weather or time of day |
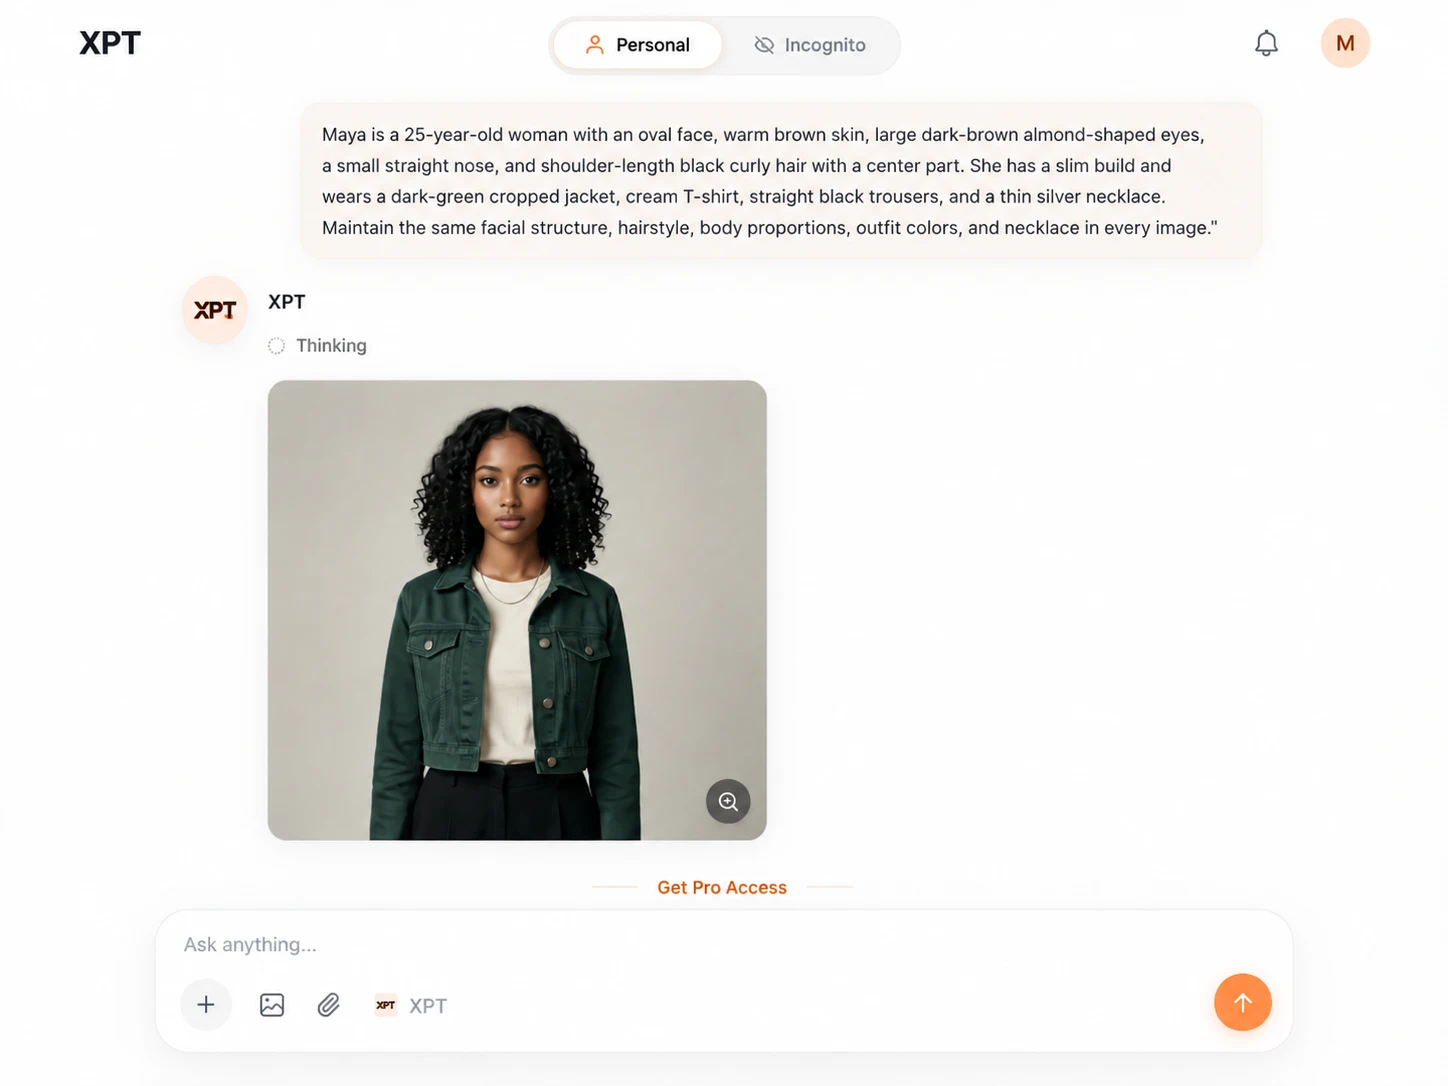
For example: “Maya is a 25-year-old woman with an oval face, warm brown skin, large dark-brown almond-shaped eyes, a small straight nose, and shoulder-length black curly hair with a center part. She has a slim build and wears a dark-green cropped jacket, cream T-shirt, straight black trousers, and a thin silver necklace. Maintain the same facial structure, hairstyle, body proportions, outfit colors, and necklace in every image.”
Step 2: Create a Character Reference Sheet
Open the AI Character Image Generator and generate a clean character sheet before creating complex scenes.
“Create a character reference sheet for Maya using the fixed description below. Show the same character in front, three-quarter, side, and back views, plus three facial expressions: neutral, happy, and concerned. Use a plain light-gray background, even lighting, consistent scale, and the same outfit in every view. Keep her facial structure, hairstyle, skin tone, body proportions, clothing details, and silver necklace identical across the entire sheet.”
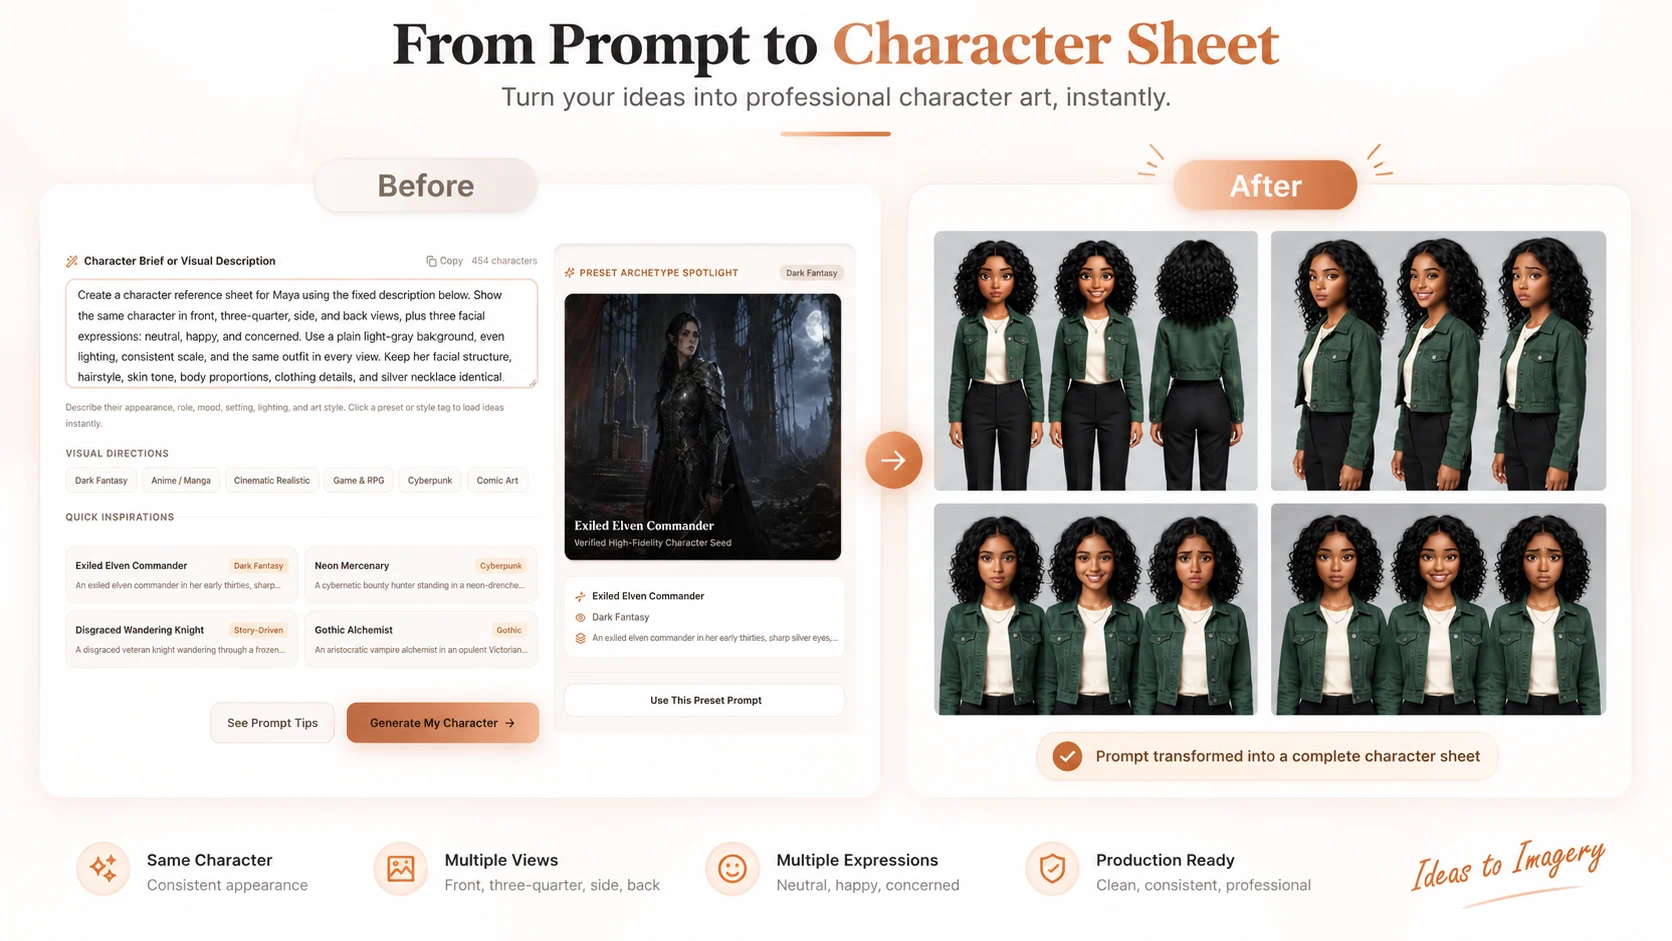
- Front and three-quarter facial views.
- Side profile.
- Full-body proportions.
- Hairstyle from several angles.
- Standard outfit.
- Signature accessories.
- Several basic expressions.
Choose the most consistent sheet as the primary visual reference.
For more guidance on using uploaded references, see how to edit images with a reference image.
Step 3: Generate the First Scene
Upload the character sheet and describe the new scene.
Identify the reference image, repeat the fixed identity block, and then add the changeable scene instructions.
“Use Image 1 as the character reference for Maya. Preserve her exact facial structure, warm brown skin, dark-brown almond-shaped eyes, shoulder-length black curly hair, slim proportions, dark-green jacket, cream T-shirt, black trousers, and silver necklace. Show Maya sitting beside a café window, reading a notebook with a focused expression. Use soft morning light, a medium three-quarter shot, and a realistic editorial photography style.”

- Reference image.
- Fixed character identity.
- New scene, pose, expression, and camera direction.
Do not redesign the character while changing the scene.
Step 4: Create Additional Images From the Same Reference
Return to the original character sheet for every new scene.
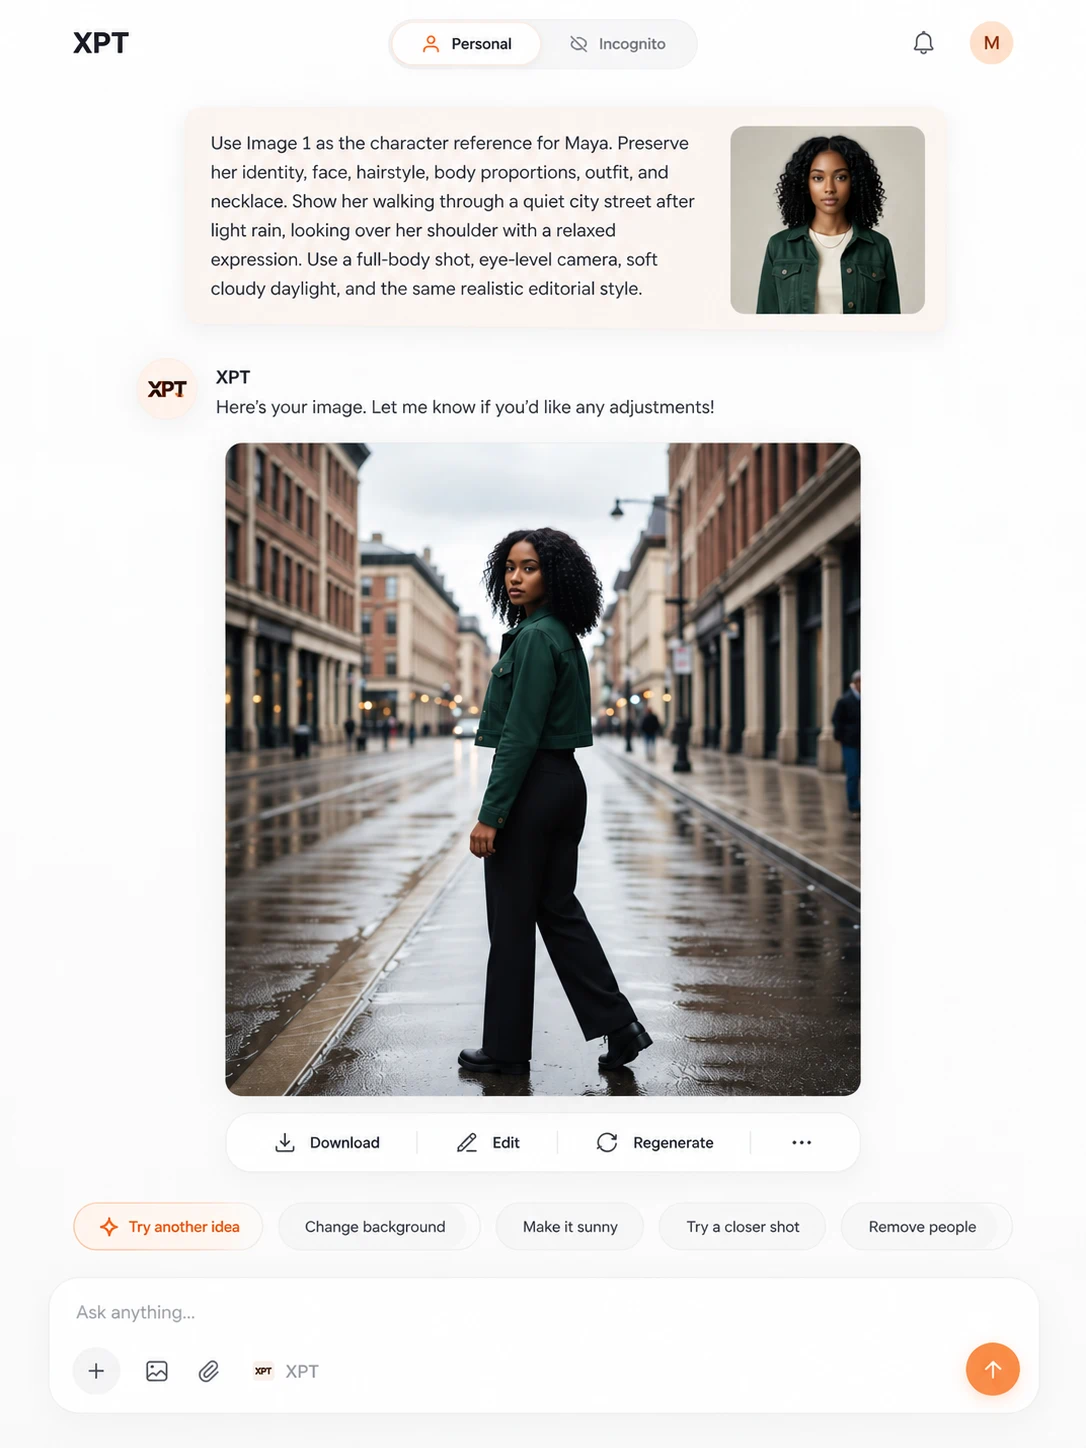
For an outdoor scene: “Use Image 1 as the character reference for Maya. Preserve her identity, face, hairstyle, body proportions, outfit, and necklace. Show her walking through a quiet city street after light rain, looking over her shoulder with a relaxed expression. Use a full-body shot, eye-level camera, soft cloudy daylight, and the same realistic editorial style.”
For a new outfit: “Use Image 1 as the character reference for Maya. Preserve her face, skin tone, eyes, hairstyle, body proportions, and silver necklace. Replace only her outfit with a navy evening dress with a simple square neckline. Keep her identity fully recognizable and leave all other character features unchanged.”
If you want to change the outfit, hairstyle, and location, make those edits separately. Changing too many identity-related details in one generation increases the chance of character drift.
Use a Fixed Character Prompt Block
Create one reusable identity block and paste it into every prompt.
| Prompt Section | Purpose |
|---|---|
| Reference | Identifies the approved character image |
| Identity block | Locks the face, hair, body, and signature traits |
| Scene | Defines the location and activity |
| Expression and pose | Controls the character’s performance |
| Camera | Defines framing, angle, and distance |
| Style | Maintains the same visual treatment |
| Constraints | Lists details that must not change |
A reusable prompt structure looks like this:
“Use [reference image] as the identity reference for [character name]. Preserve [fixed facial traits, hairstyle, body proportions, signature clothing, and accessories]. Show the character [action] in [location] with [expression and pose]. Use [camera angle and framing], [lighting], and [visual style]. Do not change [protected identity details].”
How to Check Character Consistency
Compare every new image with the approved reference.
Check:
- Face shape and proportions.
- Eye shape, color, and distance.
- Nose and mouth.
- Skin tone.
- Hairline, length, texture, and parting.
- Height and body proportions.
- Clothing colors and construction.
- Accessories and their placement.
- Illustration or photography style.
Minor lighting changes are normal. Changes to the character’s identity should be corrected.
If the face drifts, return to the reference sheet and generate the scene again with a simpler prompt.
Common Character Consistency Problems
The Face Changes Between Scenes
Use a clearer face reference and repeat the same fixed identity description. Avoid changing the age, makeup, hairstyle, and expression at the same time.
The Hairstyle Changes From Another Angle
Include front, side, and back views in the reference sheet. Describe the hair length, texture, parting, and silhouette.
The Character’s Body Proportions Change
Add a full-body reference and specify the camera angle. Extreme camera positions can make proportions appear different even when the identity is similar.
Clothes Lose Important Details
Name the details that must stay fixed, such as collar shape, sleeve length, buttons, color blocking, or accessories.
The Art Style Changes
Use the same style description in every prompt. Do not alternate between terms such as cinematic photography, anime, watercolor, 3D render, and comic illustration unless you intentionally want a new style.
Several Characters Become Mixed Together
Create a separate reference sheet and identity block for each character. In group scenes, describe where each person appears and what each person is doing.
Character Consistency Prompt Examples
| Use Case | Prompt |
|---|---|
| New Scene | Use Image 1 as the character reference. Preserve the exact face, hairstyle, body proportions, outfit, and accessories. Place the character in a quiet bookstore, reaching for a book on a high shelf. Use warm indoor light and a medium full-body shot. |
| New Expression | Use Image 1 as the identity reference. Keep all facial features, hair, clothes, and proportions unchanged. Show the character smiling naturally with relaxed eyes. Use the same camera angle, lighting, and visual style. |
| Side Profile | Use Image 1 as the character reference. Create a clean side-profile portrait while preserving the exact forehead, nose, lips, chin, hairstyle, skin tone, and clothing. Use neutral lighting and a plain background. |
| New Pose | Use Image 1 as the identity reference. Keep the character unchanged and show them sitting cross-legged on the floor while sketching in a notebook. Preserve the outfit and accessories. |
| Outfit Change | Use Image 1 as the character reference. Preserve the face, hair, skin tone, and body proportions. Change only the outfit to [new outfit]. Keep all other identity details unchanged. |
| Group Scene | Use Image 1 for Character A and Image 2 for Character B. Preserve each character’s separate identity and clothing. Place Character A on the left and Character B on the right. Do not blend their facial features, hairstyles, or outfits. |
Build the Character Before Building the Story
Character consistency depends on giving the AI stable information. Create one approved character sheet, freeze the identity description, and reuse both for every image. Change the scene separately while checking each result against the original reference. Use the AI Character Image Generator to develop the character sheet, create new scenes, and refine images that drift from the approved design. For broader editing techniques, see how to edit images with AI prompts.