A single product photo rarely does enough for an online store.Shoppers may want to see the item clearly, understand its size, imagine using it, inspect an important detail, and compare available options. Producing all those images through separate photo shoots takes time, especially when you regularly launch new products or campaigns AI can help turn a small collection of real product photos into a broader set of creative assets.
The strongest workflow starts with the product story rather than the image generator. Decide what customers need to learn, prepare reliable visual references, and create each image for a specific part of the shopping journey.
How to Create Product Photos With AI
This workflow uses a decorative handheld fan as an example. The reference product has a round transparent surface, a green border, a green geometric pattern, and a beige handle.
Build a Shot List Around the Product
Before opening the editor, decide which images would help customers understand the fan.
A useful shot list might include:
| Image | Purpose | Visual Direction |
|---|---|---|
| Product overview | Show the complete fan clearly | Simple neutral background |
| Pattern close-up | Highlight the green geometric design | Detailed crop of the fan surface |
| Hand-held image | Show how the fan is held | Natural hand position |
| Lifestyle image | Place the fan in a summer setting | Garden, café, or picnic scene |
| Scale image | Provide a sense of proportion | Fan beside familiar objects |
| Gift presentation | Show a possible gifting context | Coordinated wrapping and subtle decoration |
| Campaign image | Promote a seasonal collection | Styled scene with copy space |
Each image should answer a different customer question. This avoids creating several attractive images that all serve the same purpose.
Prepare the Product References
Take clear photos of the fan from the angles required by the shot list.
The reference set could include:
- A complete front view.
- A back view.
- A side view showing the product’s thickness.
- A close-up of the green geometric pattern.
- A close-up of the border and central connector.
- A clear view of the beige handle.
- A photo of someone holding the fan.
- The packaging and included items.
Open XPT and upload the references needed for the first image. Explain what each uploaded image should control. For example, one image can define the complete product shape while another confirms the pattern or handle details.
For more guidance, read how to edit images with a reference image.
Create the First Product Concept
Begin with a lifestyle image that establishes the overall visual direction.“Use Image 1 as the exact product reference. Create a bright summer lifestyle image for shoppers looking for a decorative handheld fan. Place the fan on a light wooden table beside a folded linen cloth and a small glass of iced tea. Use soft natural daylight, a slightly elevated camera angle, and a clean editorial composition. Keep the fan as the clear focal point and leave open space on the left for website copy.”
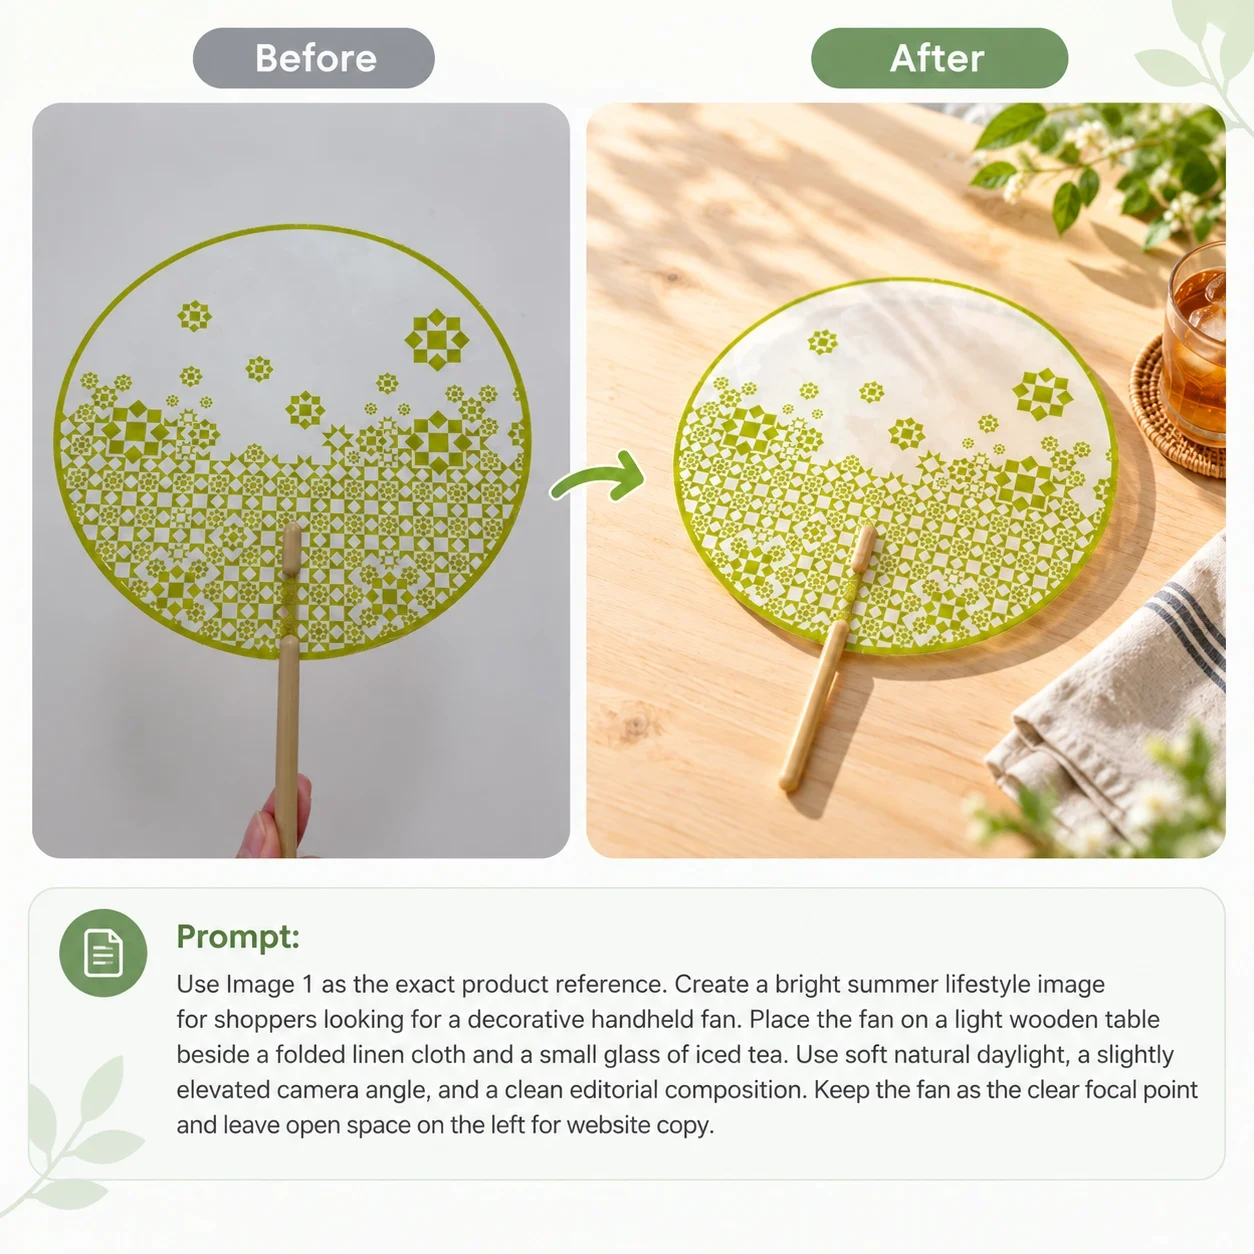
Generate a few variations of the same concept. Change one creative element at a time, such as the camera distance, background color, lighting, product position, or supporting objects. This makes the results easier to compare.
Expand the Concept Into More Product Images
Once the first image establishes a suitable style, create the other images from the original references.
For a pattern close-up:“Create a detailed product photograph focused on the lower half of the handheld fan. Show the original green geometric pattern clearly while keeping part of the border and central connector visible. Use soft side lighting and a clean neutral background. Preserve the exact pattern shapes, positions, spacing, density, and color shown in the reference.”
For a hand-held image: “Show a person naturally holding the exact fan by its beige handle in a bright outdoor setting. Keep the complete circular surface visible and facing the camera. Use a relaxed, anatomically correct grip and soft daylight. Preserve the fan’s transparent surface, green border, geometric pattern, handle, connector, and proportions.”
For a homepage banner: “Create a wide 16:9 website banner using the uploaded handheld fan as the exact product reference. Position the fan in the right third of the frame. Build a light summer setting with subtle green and neutral tones, then leave the left half calm and uncluttered for a headline and button. Preserve the complete product and do not generate text.”
For an Instagram image: “Create a vertical 4:5 campaign image using the uploaded fan as the exact product reference. Position the complete fan in the lower-center area against a bright, uncluttered summer background. Repeat subtle green accents in the scene and leave clean space above the product for separately added copy. Do not generate text.”
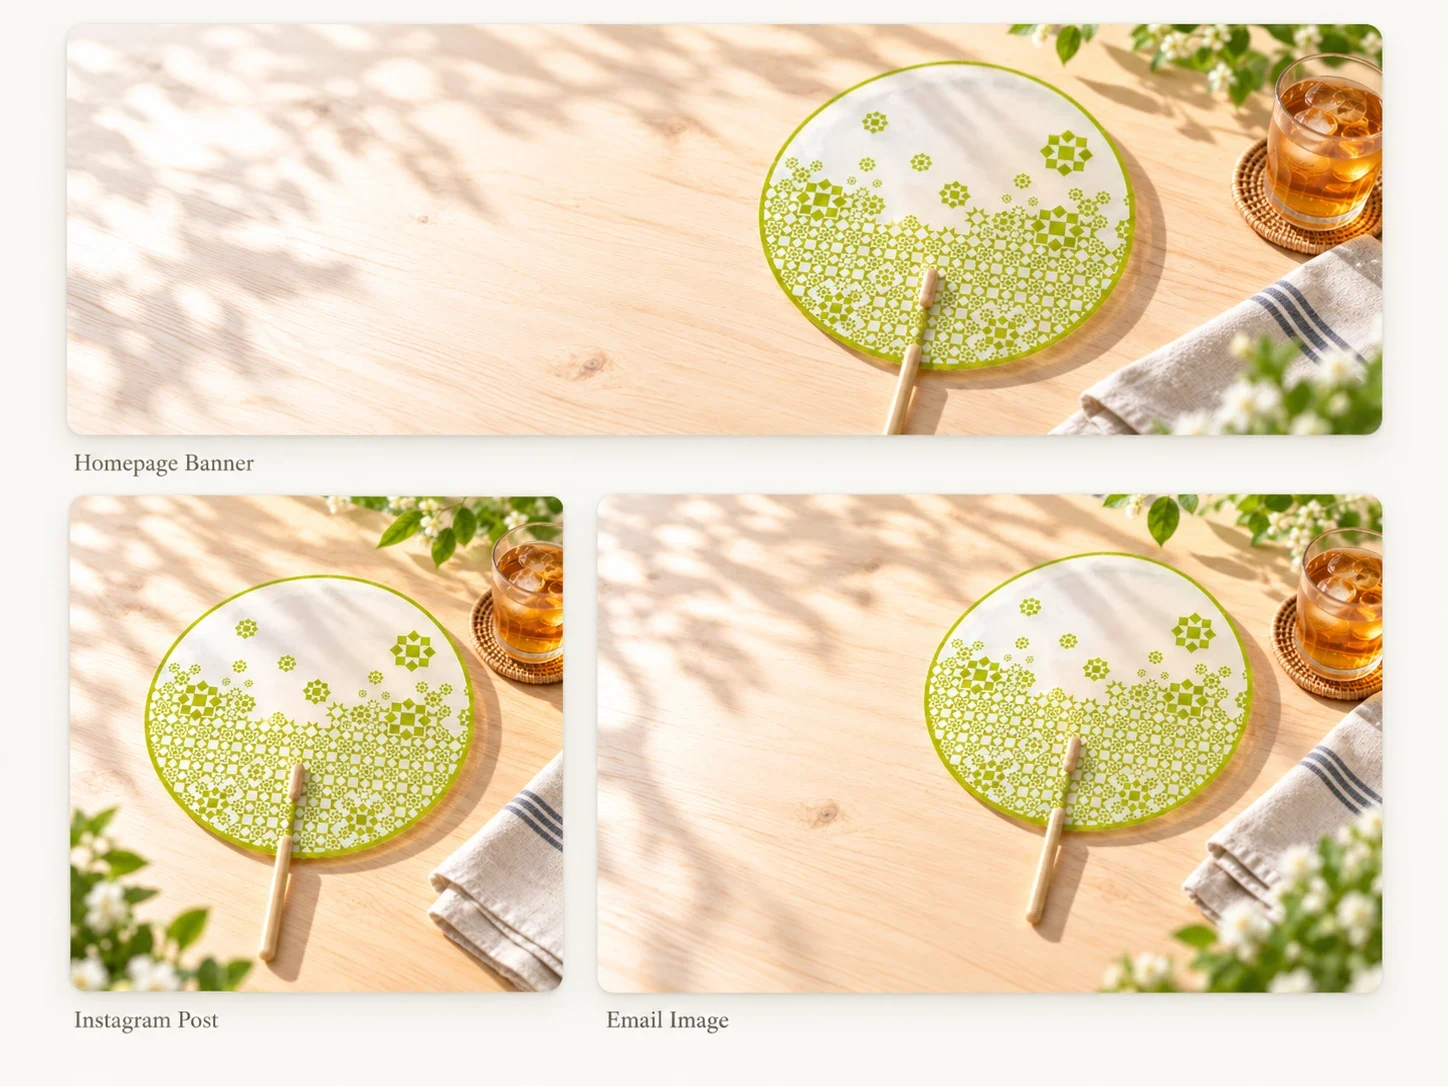
Compare the Images as a Complete Set
Review the generated images together rather than approving each one separately.
Check whether:
- The fan remains circular in every image.
- The transparent surface retains its original appearance.
- The green pattern stays in the correct position.
- The border remains the same color and width.
- The beige handle and central connector are consistent.
- The product appears to have the same proportions.
- Hands interact naturally with the handle.
- Props do not appear to be included accessories.
- Each image provides different information.
If the product changes, return to the original reference rather than repeatedly editing a generated version. This reduces the chance of small inaccuracies carrying into the rest of the image set.
What Product Photos Does an E-commerce Store Need?
A useful image collection guides shoppers from initial interest to a purchase decision. Instead of generating several decorative variations, assign every image a clear purpose.
| Image Type | Customer Question | Recommended Content |
|---|---|---|
| Product overview | What exactly am I buying? | A clear, unobstructed view of the complete item |
| Alternate angle | What does it look like from another side? | Front, back, side, top, or three-quarter views |
| Detail image | What are the materials and important details? | Close-ups of texture, controls, stitching, closures, or finishes |
| Lifestyle image | Where and how would I use it? | The product placed in a realistic environment |
| Scale image | How large is it? | A verified size reference or dimensional graphic |
| Feature image | What makes it useful? | One real feature demonstrated clearly |
| Package-content image | What will I receive? | The product, packaging, and included accessories |
| Variant image | Which version should I choose? | Consistent images of each real color, size, or style |
The number and order of images depend on the product and sales channel. Prioritize the information customers need to make a confident decision.
E-commerce Product Photo Ideas You Can Create With AI
Clean Studio Product Photos
A neutral studio background keeps attention on the item and works well for product grids, category pages, and store listings. AI can replace a cluttered background, create a consistent surface, and balance the scene around the product. Keep enough space around the item so it does not feel cramped when displayed as a thumbnail.
Lifestyle Product Photos
Lifestyle images place the item in a believable use environment. A lamp might appear in a reading corner. A water bottle could sit beside a gym bag. A notebook might be shown on an organized desk.
Choose a setting that explains the product’s purpose. Avoid environments that hide important details or imply an unsupported use.
Product Detail Images
Close-up images can show texture, materials, stitching, fasteners, buttons, finishes, or other useful details. Use a real close-up photograph whenever the exact construction matters. AI should not invent details that are hidden in the source image.
Size and Scale Images
Showing a product beside a familiar object or in a realistic room can help customers understand its size. Use verified dimensions when creating the composition. AI may otherwise make the product larger or smaller to improve the image.
Product Photos With Models
Fashion, accessories, and wearable products often need context from a person. Use accurate product references and inspect the fit, pattern, fastening, scale, hands, and contact points carefully. If the product interacts with the body, the image should remain physically believable.
Seasonal Campaign Images
You can place the same product into holiday, summer, back-to-school, or gift-oriented scenes without arranging a separate physical shoot for every campaign. Keep seasonal decorations outside the product itself. Make sure props do not look like included accessories.
Social Media Product Images
The same product may need square, vertical, and horizontal versions for different platforms. AI can extend the background or rebuild the composition while keeping the item intact. Leave clean space for captions and calls to action when required.
Consistent Images Across a Product Collection
A store looks more coherent when product images use related lighting, backgrounds, camera angles, and spacing. Create one approved visual direction and apply it to each product separately. Use accurate references for every real product and variant.
Build a Consistent Look Across the Store
Visual consistency does not mean using the same background in every image.
It means repeating a controlled set of choices:
- Similar camera height.
- Consistent product scale.
- A limited color palette.
- Related lighting direction.
- Comparable shadow softness.
- Repeated surface materials.
- A predictable amount of negative space.
- A consistent level of background detail.
Create a short visual direction that can be reused across the catalog.
For example:“Use a warm minimal editorial style with light wood, off-white surfaces, soft directional window light, natural shadows, muted neutral colors, and low visual clutter. Keep the product as the strongest point of contrast.”
Pair that direction with a different product reference and commercial goal for each image.
What AI Should and Should Not Decide
AI is useful for creative variables such as:
- Background environment.
- Supporting props.
- Lighting mood.
- Composition.
- Seasonal styling.
- Canvas extension.
- Color palette around the product.
- Negative space.
- Campaign direction.
Your verified product information should control:
- Product shape.
- Real color.
- Materials.
- Dimensions.
- Included components.
- Packaging.
- Labels and logos.
- Functional details.
- Compatibility.
- Product claims.
When the generated scene conflicts with the product record, the verified product information takes priority.
Common AI Product Photography Problems
Every Image Looks Like a Different Brand
This often happens when each prompt uses unrelated visual styles. Create one visual direction for the collection and repeat its palette, lighting, surfaces, and level of detail.
The Product Gets Lost in the Scene
Reduce the number of props and strengthen the separation between the item and the background. Ask for a simpler composition, clearer lighting, or a closer camera distance.
The Product Changes Between Images
Use the same reference pack and repeat the product’s essential visual traits in every prompt. Generate new images from the original references instead of repeatedly editing the last generated result.
Logos and Labels Become Distorted
Small lettering and detailed logos may change during generation. Preserve the original label area when possible. If text remains distorted, generate the scene first and add the verified label or packaging during final production.
The Images Look Too Similar
Return to the shot list and change the image’s purpose rather than only changing the background color. Move from a general lifestyle image to a detail, scale, handling, feature, or campaign image.
A Good Image Does Not Fit the Website
Generate the composition for its actual placement. Specify the orientation, product position, and required negative space before creating the image. Do not depend on a later crop that may remove important content.
Text Inside the Image Looks Wrong
Ask for a text-free base image. Add the final headline, feature label, price, or call to action afterward so the copy remains accurate and editable.
The Scene Implies an Unsupported Feature
Remove objects, visual effects, or situations that suggest a capability the product does not have. A lifestyle image should provide context without changing what the product promises.
10 Optimized Prompts for E-commerce Product Photos
Replace the bracketed details with verified information about your product.
| Goal | Optimized AI Prompt |
|---|---|
| Product Gallery Hero | Use the uploaded images as the exact reference for [product]. Create a polished product-gallery hero on a soft [background color] seamless backdrop. Use a centered three-quarter composition, diffused key light from the upper left, a subtle fill light, and a realistic contact shadow. Keep the complete product visible with comfortable space around it. Preserve its exact silhouette, proportions, materials, color, finish, branding, controls, and construction. |
| Premium Lifestyle Scene | Create a lifestyle image for [target customer] using [product] in a realistic [environment]. Place the product in the foreground at a natural scale, with supporting objects limited to [two relevant props]. Use [morning/evening] light and a refined editorial composition. Preserve every visible product feature from the uploaded references and avoid adding unverified accessories or functions. |
| Feature Demonstration | Build a product-page image focused on the verified feature “[feature].” Show the product from an angle that makes this feature easy to understand, using a simple [setting] and controlled lighting. Keep the feature area sharp and the background secondary. Do not add labels or text. Preserve the product’s real construction, size, components, and materials. |
| Material Close-Up | Create a close-up photograph of the uploaded product that highlights its real [material or finish]. Use soft side lighting to reveal the existing texture, edges, seams, and surface depth. Keep the color neutral and true to the reference. Do not smooth, exaggerate, replace, or invent any material detail. |
| Size-in-Context Image | Place the exact [product] beside [familiar reference object] in a realistic [environment] to help shoppers understand scale. Use the verified dimensions [dimensions] when setting the proportions. Keep both objects on the same visual plane with consistent perspective, contact, and shadows. Do not alter the product to improve the composition. |
| Homepage Banner | Create a wide 16:9 website banner featuring the uploaded [product]. Position the product in the right third and build a [brand style] environment around it. Leave the left half calm and uncluttered for a headline and button that will be added later. Do not generate text. Preserve the product’s exact design, color, logo, scale, and materials. |
| Vertical Social Ad | Create a vertical 4:5 campaign image for [product] aimed at [audience]. Use a strong mobile-first composition with the product occupying the central lower area and a simple visual hook based on [campaign idea]. Leave clean space near the top for separately added copy. Preserve the real product and avoid generated words, badges, prices, or unsupported claims. |
| Seasonal Campaign | Present the exact [product] in a subtle [holiday or season] setting using [palette], [lighting], and no more than [number] supporting props. Make the product the clear focal point and keep seasonal elements in the background. Preserve its real packaging, branding, color, components, and scale. Do not imply that decorative props are included. |
| Coordinated Collection | Create a coordinated catalog image for the uploaded [product] using the supplied style reference only for background, lighting, camera height, shadow softness, and spacing. Do not copy the reference product. Preserve the uploaded item’s individual shape, materials, color, details, and branding so it remains accurate while fitting the collection. |
| Email Campaign Image | Create a clean horizontal email image featuring [product] and communicating the mood “[campaign message].” Use a simple [setting], clear contrast, and a composition that remains readable at a small size. Place the product slightly left of center and leave moderate space on the right for copy. Do not generate text or alter the product. |
Turn One Product Shoot Into a Visual System
AI product photography becomes more useful when it supports a repeatable content system. Begin with a shot list rather than a blank prompt. Give the AI reliable references, define what every image should communicate, and develop one approved visual direction for the store. From there, you can create product-gallery images, lifestyle scenes, campaign banners, email graphics, and social variations without restarting the creative process each time.
Use XPT to explore and refine those directions while keeping the real product photos and approved product information nearby. The final test is whether the complete image set helps shoppers understand the product and recognize it consistently wherever the brand appears.
For marketplace-specific image requirements, read how to create Amazon product images with AI.